
Easy Checkerboard Beanie Pattern: Step-by-Step Knitting Guide for Beginners | VimlaKnit.
Knit a classic checkerboard beanie with this easy and free knitting pattern. Perfect for beginners, this guide uses just knit and purl stitches to knit a beautiful texture. Follow our simple, step-by-step instructions and photos to knit a cozy, stylish beanie.
Vimla Negi
8/24/2025
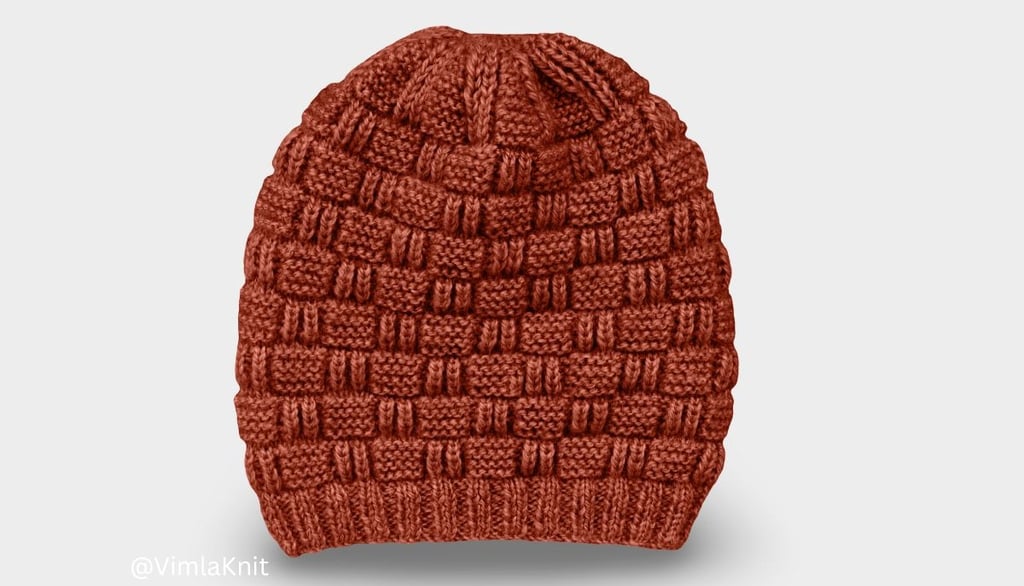
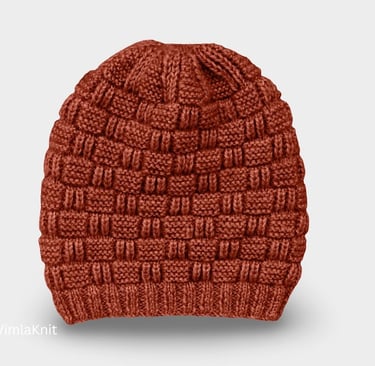
Welcome to VimlaKnit’s new blog post. Today, we’ll learn how to knit an easy checkerboard beanie pattern for beginners.
We used the checkerboard stitch pattern in the beanie. This pattern can also be used to knit a headband, where it will look just as beautiful. How to adjust the design in the beanie and then how to do the bind-off—I have shared it step by step below.
Knitting Material
Knitting Wool- Lion Brand Vanna’s Choice
Knitting Needle- 3.25 MM Straight Needle
Knitting Abbreviation
P2tog: Purl 2 sts together
SL(P): Slip(Purl Wise)
K: Knit
P: Purl
STS: Stitches/Stitch
RS: Right Side
WS: Wrong Side
Step-by-Step Beginner Checkerboard Stitch Beanie Knitting Pattern.
Cast on- 112sts
Sizes available: One size/22-24 Inches
Skill level: Easy/Beginner
Pattern language: English
Techniques used: Basic knitting skills- casting on, 2X2 Rib Stitch for brim, Shape your project by decreasing stitches & Join your work neatly to finish the project.
How to Knit a Beanie Brim (Step-by-Step Guide)
The brim of this beanie is worked in a 2x2 rib stitch, which is created by alternating two knit stitches with two purl stitches across the row.
A 2x2 rib stitch is commonly used in hat brims because it produces a neat, balanced texture that enhances the overall appearance of the finished project. By using this method, the brim not only fits securely but also adds a classic and professional look to the beanie.
Row 1(RS): SL1(P),* K2, P2 repeat from * to *..……last 3 sts K2, P1
Row 2(WS): SL1(P),* P2, K2* repeat from * to *…………last 3 sts P3
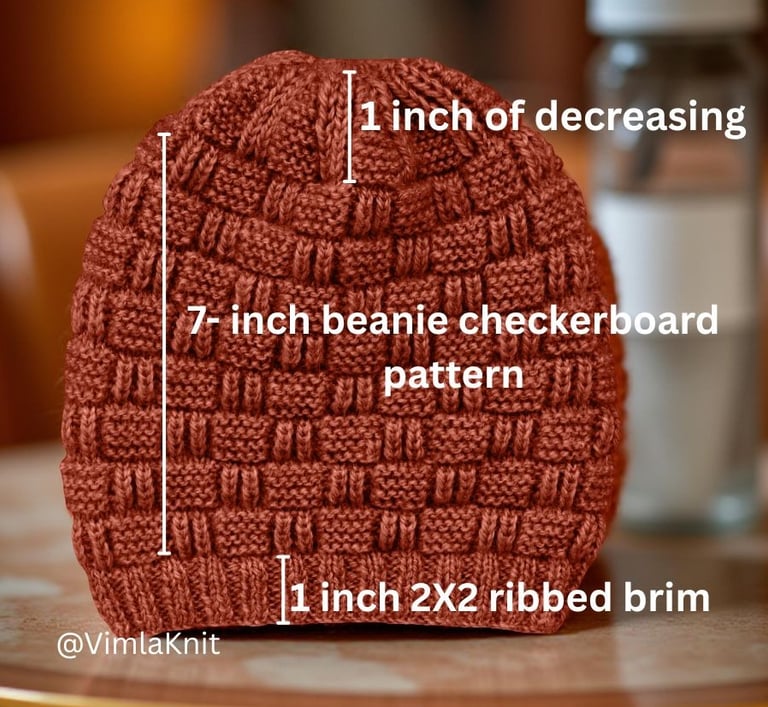
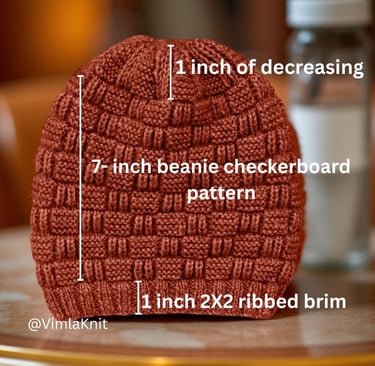
Repeat the rows until the brim measures 1 inch. For this beanie, I knitted a total of 10 rows.
Step-by-Step Knitting Beanie Pattern
The beanie is knitted with a simple
checkerboard stitch pattern, but it looks very eye-catching. This pattern is worked over 10 stitches and 20 rows. The instructions for adjusting this pattern into the beanie are given below.
Row 1(RS): SL1(P), Knit all sts......last sts P1
Row 2(WS): SL1(P), Purl all sts......last sts P1
Row 3 (RS): SL1(P), * (P1, K1 from first block) 2 times, P1, P5 *, repeat from * to * ................. last sts P1
Row 4(WS): SL1(P), * P5, (K1 from first block, P1) 2 times, K1 from first block *, repeat from * to * ............... last sts P1
Row 5(RS): Same as row 3
Row 6(WS): Same as row 4
Row 7(RS): Same as row 3
Row 8(WS): Same as row 4
Row 9(RS): Same as row 3
Row 10(WS): Same as row 4
Row 11(RS): SL1(P), Knit all sts......last sts P1
Row 12(WS): SL1(P), Purl all sts......last sts P1
Row 13(RS): SL1(P), * P5, (P1, K1 from first block) 2 times, P1 *, repeat from * to * ................ last sts P1
Row 14(WS): SL1(P), *(K1 from first block, P1 ) 2 times, K1 from first block, P5 *, repeat from * to * .................. last sts P1
Row 15(RS): Same as row 13
Row 16(WS): Same as row 14
Row 17(RS): Same as row 13
Row 18(WS): Same as row 14
Row 19(RS): Same as row 13
Row 20(WS): Same as row 14
After finishing the brim, continue knitting by repeating the full set of 20 rows in the checkerboard stitch pattern until the cap reaches the desired length.
For my beanie, I worked a total of approximately 8 inches in length. This measurement includes 1 inch for the ribbed brim at the bottom and around 7 inches for the main design portion in checkerboard stitch.
To achieve this length, I completed 4 full repeats of the 20-row pattern and then added 10 additional rows.
Step-by-Step Guide: Decreasing a Knitted Hat
To shape the beanie, the stitches will be decreased. After binding off, the length of the beanie will increase by approximately 1 inch. While binding off, the checkerboard stitch pattern has been carefully maintained to ensure that the beanie looks neat and attractive. The complete pattern is given below.
Row 1(RS): SL1(P), * (P1, K1 from first block) 2 times, P2tog, P4 *, repeat from * to *……………… last sts P1
There are 101 stitches remaining on the needle.
Row 2(WS): SL1(P), * P4, (K1 from first block, P1) 2 times, K1 from first block *, repeat from * to * ……………….. last sts P1
Row 3(RS): SL1(P), * (P1, K1 from first block) 2 times, P2tog, P3 *, repeat from * to * …………………last sts P1
There are 90 stitches remaining on the needle.
Row 4(WS): SL1(P), * P3, (K1 from first block, P1 ) 2 times, K1 from first block *, repeat from * to * ……………….. last sts P1
Row 5(RS): SL1(P), * (P1, K1 from first block) 2 times, P2tog, P2 *, repeat from * to * ……………last sts P1
There are 79 stitches remaining on the needle.
Row 6(WS): SL1(P), * P2, (K1 from first block, P1) 2 times, K1 from first block *, repeat from * to * ……………….. last sts P1
Row 7(RS): SL1(P), * (P1, K1 from first block) 2 times, P2tog, P1 *, repeat from * to * ……………last sts P1
There are 68 stitches remaining on the needle.
Row 8(WS): SL1(P), * (P1, K1 from first block) 3 time *, repeat from * to *………………… last sts P1
Row 9(RS): SL1(P), * (P1, K1 from first block) 2 times, P2tog *, repeat from * to *………………last sts P1
There are 57 stitches remaining on the needle.
Row 10(WS): SL1 , * (K1 from first block, P1) 2 times, K1 from first block *, repeat from * to *
Row 11(RS): SL1(P), P1,* P3tog, P2tog repeat from to *
There are 24 stitches remaining on the needle.
Row 12(WS): Purl all sts
Finally, pick up the remaining 24 stitches onto a sewing needle, secure them tightly, and then seam the cap.
I hope you like this easy checkerboard beanie knitting pattern. Please feel free to share your thoughts and feedback.
Knitting
Explore patterns and tutorials for all levels.
© 2025. All rights reserved.